技术参数
Technical parameters |
|
|
产品名称
Product name | 镁棒绕丝机
(智能、远程控制、带数据库) | Magnesium rod winding machine
(Intelligence \Remote control \Database) |
|
|
|
产品组成
Product composition | 1.电机:伺服电机
2.控制系统:自主知识产权绕线控制系统
3.触摸屏语言:中英文 | 1. Motor: servo motor
2. Control system: winding control system with independent intellectual property rights
3. Touch screen language: Chinese or Engish |
|
|
|
|
|
主要参数
Main parameters | 1.电压:AC220 V
功率:400 W
2.有效行程:700mm
3.有效宽度:1.5-25mm
4.绕线速度:1-10转/秒
5.触摸屏:信捷7寸
6.PLC:信捷
7.远程模块:信捷
8.张力器:ZX3YN中空型磁粉制动器
9.绕丝模式:单丝、双丝
10.DC电源24V:深圳明纬
11.伺服电机:普菲德 400w
12.步进电机:57步进电机
13.Y轴丝杆1:5mm
Z轴丝杆1:4mm
14.T型导轨:4 | 1. Voltage: AC220V
Power: 400W
2. Effective travel:700mm
3. Effective width:1.5-25mm
4. Winding speed: 1-10 rpm
5. Touch screen:Xinjie 7 inches
6. PLC:Xinjie
7. Remote module:Xinjie
8. Tensioner:ZX3YN hollow magnetic powder brake
9. Winding mode:single or twin-wire
10. DC power24V:shenzhen mingwei
11. Servo motor: Pufield 400W
12. Stepper motor:57 stepper motor
13. Y-axis lead screw1:5mm
Z-axis lead screw1:4mm
14. T-shaped guide rail:4 |
|
|
|
|
|
|
|
|
|
|
|
|
|
|
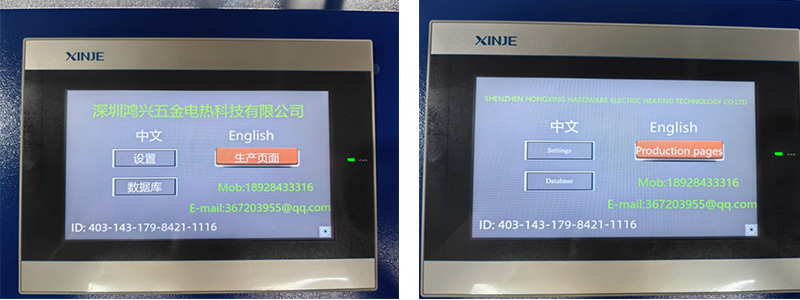
触摸屏说明:
1.通电后开机,打开红色按钮,主页显示为语言选择,选择需要的语言,如中文、英文。
1.After powering on and turning on the machine, press the red button. The home page is for language selection. Select the language you need, such as Chinese, English.
2.设置页面。
1)设置Y轴原点:点击左移或右移,调整起绕点。调整后点击设置Y轴原点3秒左右显示为0,即设置完成。
2)旋转速度:表示发热丝绕制的速度。根据实际情况调整,速度为5-7000,圈数较少时需降低速度至5-1000。
3)Z轴设定位置:表示镁棒的长度。
4)Z轴启动与复位:调整固定镁棒的轴的位置。
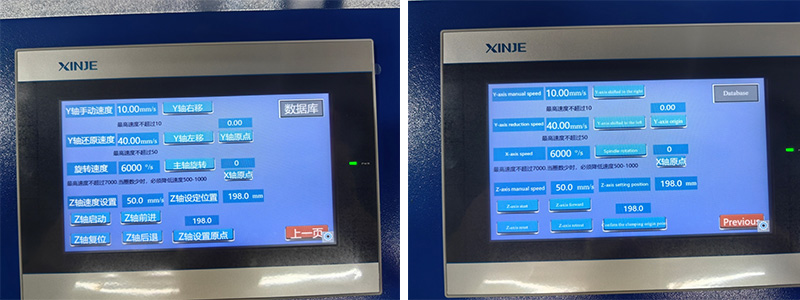
2.Settings page.
1) To set the origin of the Y-axis: Click left shift or right Shift to adjust the starting point. After adjustment, click to set the Y-axis origin for about 3 seconds. If it shows 0, the setting is complete.
2) Rotational speed: It indicates the speed at which the heating wire is wound. Adjust according to the actual situation. The speed is 5 to 7,000. When the number of laps is small, the speed should be reduced to 5-1,000.
3) Z-axis setting position: Indicates the length of the magnesium rod.
4) Z-axis start and reset: Used to adjust the position of the axis that fixes the magnesium rod.
3.生产页面。
1)丝直径:表示绕制的发热丝的直径,输入直径后系统自动显示发热丝电阻。
2)总电阻:表示所需总电阻。
3)镁棒直径和长度:表示所绕制镁棒的直径和长度。
4)总圈数、发热丝总长度和节距系统将自动计算。
5)长度:根据用户需求自行设置,圈数系统自动计算。例:如下图所示,镁棒长度为198mm,可分为起始段从密绕到疏,中间段均匀绕,尾段从疏绕到密;或者中间段输入总长度198mm,起始段和尾段输入0,实现整段均匀绕。
6)复位时间:表示镁棒绕制完成几秒后自动回到起绕点,根据用户需求点击启用或禁用。
7)WIEI设置:点击WIFI进入设置页面,搜索WIFI。输入WIFI密码并保存,此设置可执行远程控制及软件升级。
8)所有设置都在手动模式下完成,启动设备需要在自动模式。
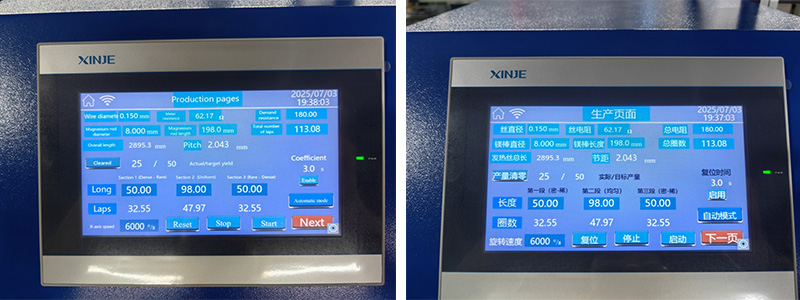
1) Wire diameter: It indicates the diameter of the heating wire wound. After inputting the diameter, the system automatically displays the resistance of the heating wire.
2) Total resistance: Indicates the total resistance required.
3) Magnesium rod diameter and length: Indicates the diameter and length of the magnesium rod to be wound.
4) The total number of turns, the total length of the heating wire and the pitch will be automatically calculated by the system.
5) Length: Set according to user requirements, and the number of turns is automatically calculated by the system. As shown in the following figure, the magnesium rod is 198mm in length and can be divided into the starting section from densely wound to sparsely wound, the middle section evenly wound, and the ending section from sparsely wound to densely wound. Or, input the total length of 198mm in the middle section, and input 0 in the starting and ending sections to achieve uniform winding of the entire section.
6) Reset time: It indicates that the magnesium rod will automatically return to the starting point a few seconds after winding is completed. Click to enable or disable it according to the user's requirements.
7) WIFI Settings: Click on WIFI to enter the Settings page and search for WIFI. Enter the WIFI password and save it. This setting enables remote control and software upgrades.
8) All Settings are completed in manual mode, and the device needs to be started in automatic mode.